Friday

Happy Easter: Free Printables Worth Celebrating All Year

Free Easter printables worth celebrating all year

Happy Easter from HomeMadeville!

Easter is about more than bunnies, eggs and Spring's arrival...It's a celebration of the new life we are given through a risen Savior.  So, how could we let this weekend come having only shared posts that didn't reflect the reason we celebrate.

Tuesday

How to Reupholster a Cedar Chest

How to Reupholster a Cedar Chest

When my mom was 16 years old, my grandparents gave her a cedar chest to use as a hope chest.  Over the years, the leather on top got ripped, but the chest was still filled with memories.  So my mom asked if I would help her reupholster it.  We had never reupholstered anything before, but thanks to many amazing bloggers, I had seen enough tutorials that I was sure we could handle the task.

Thursday

Door Bell Update

Door Bell Before & After

Have you ever grown attached to something in your home even though you hated the way it looked?

Monday

Step Stool Makeover Using Scrapbook Paper

Step Stool Makeover Using Scrapbook Paper

A step stool can have many uses around the house, especially if you have children.  That's why when my mother-in-law gave me a simple, handmade step stool that she bought at a yard sale for $2 or less, I knew I had to take it from functional to functionally fabulous!  I had been trying to decide how I wanted to makeover the step stool when I was offered some amazing paper craft supplies from Dear Lizzy Fifth and Frolic.  The amazing crisp blues, greens, pinks and yellows were a perfect complement to the bathroom where I planned on using the step stool, so I knew it was meant to be.

Dear Lizzy Sample - Available at JoAnn's on March 17, 2013

Tutorial for Step Stool Transformation

Step Stool Before & After

1. Paint the step stool.  - The first thing I did to the stool was wipe it clean and paint it.  I used some leftover wall paint.

Paint Step Stool

2.  Cut paper to size. - I picked which pieces of craft paper I needed and cut each piece to the exact size I needed.  You can now pickup these same papers and more Dear Lizzy products at Jo-Ann Fabric & Craft Stores.

Scrapbook Paper Cut to Size

3.  Glue each piece down with Mod Podge. - The next step was to put a layer of Mod Podge on each piece of scrapbook paper, as well as the location where the paper was going.  Using a brayer is the best way to make sure that no bubbles arise under your paper as it dries.

Mod Podge each layer of Scrapbook paper and let dry

 4.  Add Ribbon Trim. - In the interest of full disclosure, I must admit that I hadn't done quite as good of a job cutting my scrapbook paper as I had thought.  The top piece was just a tiny bit short of reaching the back, so I decided to add a matching ribbon that I happened to have on hand to trim it out.  I think it added a nice additional layer to the project, so it all worked out.

Ribbon Trim

5.  Add the flag banner to the sides. - I really loved the flag banner that came with the Dear Lizzy products.  It came just like a sheet of scrapbook paper, only it was perforated for easy removal.  First, I mod podged the back of the flag banner, then the area where it was going on the step stool.  I was expecting this step to be more tedious since the flag banner was small and flexible, but it was so easy to apply.  I made sure that I had the same number of flags per banner for both the top and the bottom, so that each side would match appropriately.

Mod Podge Flag Banner
  
6.  Seal the step stool with hardcoat Mod Podge. - After researching it, I decided that hardcoat Mod Podge was the best medium for sealing my step stool, since it is a piece of furniture.  The hardcoat Mod Podge will not scratch as easily and is a little more hardy for a furniture piece.  You will need at least a couple of coats.

Step Stool Makeover with Scrapbook Paper and Mod Podge

7.  Enjoy! - I am so pleased with how it turned out.  I really love how the paper makes an arrow effect on the step stool.  I hope that if you make a similar project that you will enjoy it just as much as I am enjoying mine.

I hope this little stool will inspire you to take something drab and turn it into something fab.

Happy Crafting!

Niki   

*I received Dear Lizzy, Fifth & Frolic Scrapbooking Supplies in exchange for this post, however, my opinion of the products and project are sincerely my own. :) 

--------------------------------------------------------------------------------------------------------------------

I created a video tutorial for My YouTube Channel so feel free to check it out as well.


Max and Ruby Bunny Party

Max & Ruby Bunny Party

With the Easter bunny hop, hop, hopping around the corner, I thought it was the perfect time to reveal this amazing Max & Ruby birthday party that my friend, Hannah, threw for her son.  As you can see, it was adorable.

Bunny Party Peeps on a stick

One of my favorite elements was the Peeps on a stick, or as she called them "Peeps 4 My Peeps".  I love how she put them in a little flower pot with basket grass.

Max & Ruby Hats and Goodie Bags

Each child in the class received a Max hat and a Max & Ruby goodie bag (or box in this case).

Max & Ruby Bunny Party Goodie Boxes

These bunny boxes were filled with all kinds of bunny accessories.

Bunny Party Goodie Bag ideas

Gummy carrots, plastic carrots filled with powder candy, bunny teeth gummies, bunny wind-up toy, and more were inside the bunny sack.

Bunny Party Decor

This bunny party is perfect year round, whether you are hosting a kid party for Easter or a birthday party for the little one who loves to watch Max & Ruby.  "Hop"fully it's the inspiration you need to make the kids "Hoppy".

Have a great week!!

Niki
This post was feautured at The Clumsy Crafter

Wednesday

Easter Egg Wreath Makeover Tutorial

Easter Egg Wreath Makeover Tutorial

 Easter Egg Wreath Makeover

We've all seen those wreaths that are made with Styrofoam eggs.  I had one that I bought at  Target last year, but I felt it needed a little love to jazz it up.  Below, you will find how I did it, and links to some other great Easter egg projects.

How to give your Easter egg wreath a quick makeover

1.  I started by making a bow and putting a little butterfly sticker in the center.

Make bow for Easter Wreath

2.  Next, I cut scrapbook paper to size and added it as the background.

3.  I added a pink feather boa around the edge of the wreath and tucked it under itself so it would stay tight.

Wreath Tutorial Step 3 - Add Pink Boa

4.  I added a ribbon to the back for hanging.

Then my wreath was complete!!

Easter Egg Wreath

I hope my little Easter egg wreath inspires you to look beyond the simple wreath before you and think of ways to add glam to your front door.

Happy Crafting!

Niki

*Thanks Barbara @ Chase the Star for featuring the wreath!  


Monday

Dollar Store Sock into a St. Patrick's Burp Cloth


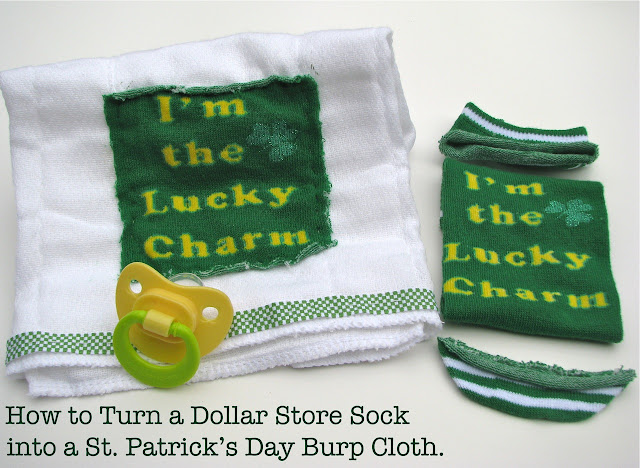
Dollar Store Sock into Burp Cloth

Even baby needs a festive St. Patty's day accessory!! 

My local Dollar Tree had some adorable little St. Patrick's day socks, which were my inspiration.

St. Patrick's Day Sock from Dollar Tree

1.  Sew a piece of ribbon to the bottom of the burp cloth, if desired.

2.  Cut the top and bottom off of the sock.

Dollar Store Sock to Burp Cloth - Cut off top & bottom

3.  Make a cut down the center of the back, so that sock will be a rectangle, rather than an arm band shape.  Note: the sock will curl up at this point, but that is OK.  Once it is sewn, that curl will give you that nifty, rough edge.

Note:  I did not trim to size until after I sewed the patch in place.

4.  Begin sewing the sock to the burp cloth.  I hand stitched so that I would have full control and be able to keep the sock straight.  However, a good seamstress could probably do that with a sewing machine....but good seamstress, I am not. :)

5.  Sew all four edges.

6.  Trim edges.  I left about 1/4 to 1/2 inch beyond the seam.

TA-DA!!!

Burp Cloth Made from Dollar Store Sock

 Now your favorite baby is ready to celebrate the Luck O' the Irish with their very own burp cloth!

Today I am linking up with some amazing craft bloggers, so click the pictures below to see their great projects.


Happy Crafting!!!

Niki