Monday

Thanksgiving Casserole

One Dish Thanksgiving Dinner

I don't have to tell you that Thanksgiving is this Thursday!  Since most people enjoy the traditional turkey, dressing and cranberry sauce dinner, I thought it was a great time to introduce you to a casserole that is pretty much Thanksgiving in one dish.  This dish can serve as a substitute if you are in charge of dinner for just one or two, if you just can't wait until Thursday for all those Thanksgiving flavors, or if you have no leftovers and still have those cravings.

Ingredients for Thanksgiving Casserole

Ingredients

1 lb. Ground Turkey
1/2 tspn. Poultry Seasoning (with Sage as one of the ingredients)
6 Servings of Brown Rice (I use instant)
1/2 - 1 Onion, Chopped
3 Cloves of Garlic, Chopped
Shaved Parmesan
Cranraisins
Salt and Pepper

Step One
Cook brown rice according to directions on the box, and preheat oven to 350 degrees.

Brown turkey, onions, garlic, & poultry seasoning

Step Two 
 
Saute ground turkey, onions, garlic, poultry seasoning, salt & pepper, stirring occasionally, until turkey is browned and onions are translucent.

Step Three 

Add a little white wine vinegar to the pan to remove all the browned bits from the bottom, then add the turkey mixture into the rice.  Sprinkle in a couple handfuls of cranraisins into the rice.  I like to make sure that there are plenty of cranberries in each serving.

Step Four 

Put all ingredients into a greased casserole dish, top with shaved parmesan, and bake for 30 minutes.

Thanksgiving Casserole


Enjoy a delicious one dish Thanksgiving dinner!


Happy Thanksgiving!!

Niki  


Sunday

New table!

Bedroom Makeover

Happy fall! While y'all were getting wind this past weekend courtesy of Hurricane Sandy, I was getting snow.  Six whole inches of it!!  It was fun and it made the Christmas music I listened to even better!  A while back I bought an old side table from my favorite thrift store.  It looked like this....

Table Before Makeover

Well, not exactly like this because I always seem to forget to take pictures of things before, but it was extremely similar.  I gave it a fresh coat of paint with a little accent of color! I love the way it turned out.

DIY Table Makeover

Yay!  I love pops of color and this table is so refreshing.  The lamp is also a project I worked on.  I found the lamp outside of my apartment complex's dumpster.  It was ugly and brown so I did the fun Pinterest project where you spruce it up with coffee filters.  It took sooooooo long.  That many "o's" are indeed needed.  Here is a picture of my entire room.  I need to get rid of some nik-naks, but I like it for a college apartment bedroom.  My headboard was made by me.  They provided the bed frame but it didn't come with a headboard so I made one out of old barn shutters.

DIY Table & Lamp Makeover


Stay warm!

XOXO
Abby


Ina & Jeffrey Garten Costume

Ina & Jeffrey Garten Costume

This weekend, for our Halloween party, the hubs and I decided to go as our TV idols...Ina & Jeffrey Garten, the Barefoot Contessa (and her adoring Count).  We had so much fun! 

All I needed for Ina was:
Blue, collard shirt with flipped up collar
Black Pants
Boat Shoes
Serving Tray, complete with Hydrangea and "decadent" goodies

Jeffrey's ensemble consisted of:
Collared Shirt
Sweater
Hair (if needed) :)
A Bottle of Wine

FYI, here's the real us:


Happy Halloween!!

Niki 


Wednesday

Tea Themed Birthday Party


Tea Themed Birthday Party Decorations

A couple of years ago, I hosted my Mother-In-Laws Birthday Celebration.  She has always taken joy in having tea parties with her three grand-daughters, so I thought it was only fitting that the celebration have a Tea Party theme.

Tea Party Tablescape

For guest favors, I enclosed an individual size teabag in an envelope I made from matching scrapbook paper and ribbon.  They each received a little chocolate lamb, as well. You can see the favors best in the first photo.

Tea bag shaped cookie

Also, at each place setting, I placed a teabag cookie.  It was shaped like a teabag, had a "Happy Birthday Liz" tag attached by string, and was dipped in chocolate to make it look even more like a teabag.  I got this amazing idea from Kim @ Frost Me Blog!  Checkout her blog for full details.

Teabag shaped cookie

 As for the food, I have my wonderful husband to thank for that.  He started the meal with a cheese tray consisting of Hoop Cheese (the guest of honor's favorite), Gruyere, and Parrano, with fig paste, candied walnuts, and balsamic syrup.  Then he prepared an amazing and colorful meal that we served buffet style.

Delicious Buffet

The salad was a Spinach Salad filled with delicious Strawberries, Candied Pecans, Feta, Bacon, and a Balsamic Vinegar Dressing.

Strawberry Spinach Salad

Chicken fingers and a veggie tray of carrots, celery and ranch was aimed at pleasing the kids, but the adults were allowed to partake too.  The main course was his very own creation: Curried Stir Fry with yellow peppers, pineapple, and butter-cilantro basmati rice.  It is a perfect Gastrique!!

Curried Chicken & Pineapple Stir Fry
Veggie Tray
Basmati Rice

The birthday cake was specially ordered with a unique surprise for the birthday girl.  When she was growing up, her mom used to make a Caramel Cake with Coconut mixed into the icing.  So to remind her of her decadent days gone by, I had them sprinkle coconut over a portion of the cake.  It was Tasty and Beautiful!!

Caramel Cake Sprinkled with Coconut

So the Sweet Tea, Water, and Salt & Pepper would be readily available, I set up a Beverage Station on top of the microwave beside my place at the table.

Drink Station

I had seen so many of my blogger friends making the Martha Stewart Pom-Poms, so I decided to make some of my own to hang over the dining table.

Pom-Poms like Martha Stewart's

To welcome the Guest of Honor, I made a sign with scrapbook paper, ribbon, and a photo mat.

Birthday Welcome Sign

Since I shared this party on my previous blog years ago, I had a great time reminding myself about the party and all my years blogging.

Hope you enjoy!

Niki

*Sharing Here: Get Your Craft On

Card Making Made Easy

Easy Homemade Card

A couple of weeks ago I received a package in the mail that made my day!  I received a box full of David Tutera Paper Crafts which are Coming Soon to JoAnn's.  The best part is that I got to try it out before it was even available.   

Card Making Made Easy

What I love most about the products is that you can make layered and embellished cards in a fraction of the time, and they are absolutely beautiful.  They are as easy as 1-2-3!

Pick a Card and Envelope Combo
Step 2 - Add Layers to Your Cards. Sand It if Needed.
Embellish the Card and Envelope

Because I was so impressed with the ease and beauty of the line, I made a little video to show you just how quick and easy it truly can be to show your love with a handmade card.


A handmade card using the Sand It feature

Although these supplies were designed for cards, you will find they are a great addition to many projects.  Just to show you the versatility, I created a scrapbooking type page to insert in my school notebook.  As I sit in my journalism classes, my little creation keeps me inspired and motivated.

A plain notebook gets a new look with card making supplies.

I started with a simple notebook and scrapbook paper.  Then, I added one of the pink cards (opened), layered the Step 2 silver cutout layer which I love, and embellished with a "Make a Wish" tag, flowers, a jewel and a few journalism related stickers.  I love how just sliding it all inside the clear cover of my binder added such style to my notebook. 

Paper Craft Layered Details

Here are a few other fabulous projects from some amazingly creative bloggers:


To sweeten the deal on this amazing product line, three lucky winners will receive a $300 grand prize pack of supplies from David Tutera's Celebrate Cardmaking line AND a personally signed book from David!  20 additional winners will receive a $50 Celebrate prize pack.  Sign up here for a chance to win: http://pages.exacttarget.com/tutera-optin-blog/.


Keep up with the David Tutera Celebrates Cardmaking line is easy at these links:

Facebook         Twitter          YouTube


*I received product in exchange for this post. However, the opinions are 100% my own.

Tuesday

Peanut Butter Pie Trifle


Not that long ago, a friend posted a picture on facebook of a trifle she made.  I instantly thought it was a peanut butter pie trifle.  WRONG!  It was a banana pudding trifle.  Although there is certainly nothing wrong with banana pudding, I was suddenly craving peanut butter pie and hoping to find a trifle that would cure my craving and be all the rave at my upcoming family gathering.

So, off to the web I went, hoping for just such a trifle.  When I couldn't find what I was looking for...  a little chocolate, some nutter butter cookies, and definitely peanut butter pie filling...I decided to create my own.


Friday

How to Create Embellished Hair Accessories

Embellished Hair Bands

Today I have the pleasure of being featured by Carolina at Moore Craft Time & Angie at The Country Chic Cottage for their Craft Lightning Challenge.

Sometimes we need to release our creative juices but only have 15 minutes or so of free time, and that is the premise of the challenge...a 15 minute or less craft.

The other day when I was shopping, I saw these "Charm"ing Hair Elastics.  I almost bought them; then I thought of my hair accessory bin filled with plain hair bands.  Suddenly, I was inspired to embellish hair accessories for my Craft Lightning Challenge and save myself some money.

Remington Hair Elastic Inspiration

Easy, DIY Hair Elastic Tutorial:

Embellished Hair Elastic Craft Supplies

Supplies Needed: 
Needle Nose Pliers            Jump Rings
 2 hair elastics               Charms  

Easy, DIY Embellished Hair Elastics
                                   
                                        1.  Open the jump rings slightly so the charms will fit inside.      
                                        2.  Place the rings on the hair elastic and the charm on the ring. 
                                        3.  Use the pliers to pinch the jump ring together.                        

            That's it!!  Now you have a simple, quick, & useful DIY craft project. 


Now head on over to Moore Craft TimeThe Country Chic Cottage to check out all of the other LIGHTNING fast crafts.


Happy Crafting!!

Niki


Saturday

Computer Lab Bulletin Board

 
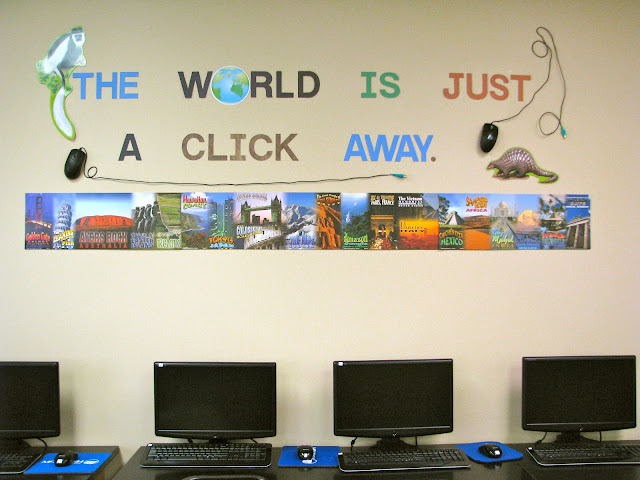
It's Back to School time all across the country.  Some are just getting prepared, and others have been in session for weeks.  Here at Homemadeville, it means our Summer Break is over and the posts should start rolling in again.  Since school seems to be a common theme all around, and I happen to do volunteer work at a local school, I thought I would kick off our new season of blogging with my computer room bulletin board.

Computer Lab Bulletin Board

At our school, the computer room doesn't actually have bulletin boards, but there is plenty of wall space that needs pizzazz.  I started out by thinking of words that are associated with computers, like network, web, online, click, mouse, etc.  Then I started thinking of ways they could be incorporated into room decor.  Since our computer lab just converted from plug in mice to wireless, I knew I could find a few to use with my "Click" decor.  (Please note: no mice were harmed in the decorating of this room.)  I used painter's tape to safely attach the paper goods to the wall without stripping the paint away.  For the mice, I stapled the cords to the wall (making sure to go around the cords not through them).  Then, I used painter's tape to secure the mice into the position I wanted.  The picture below gives a little closer view of the safari detail on the word "click", as well as the world locations featured below the wording.

Computer Room Bulletin Board Idea
  
Many of the students, teachers and parents have commented on how much they like the new decor, which is all I need to feel like my idea was a success.

Wednesday

A Thrifted Shelf!

Yay! I finally have a new post for everyone! I'm so excited to be back! Once again I want to say sorry to all for my absence.  Anyways, I have the cutest shelf to show you guys.  Where I live, we have the cutest thrift shop where all the proceeds are donated to the humane society, and the prices are a steal! I bought the cutest shelf for only $1! Life is good!

Now I know that with all of the craft blogs and Pinterest out there, it is no secret how to use some spray paint to refinish anything, but I really wanted to show everyone my finished product.  So without further adieu, here are a few items and steps I took to spruce up my shelf.

These are all the supplies I used to bring my shelf back to life.

The most important tool needed is a cold glass bottle of Cheerwine, or any other soda of your preference. (It was delicious!)

I spray painted it, (after I sanded it) a nice aqua shade of blue.  I'm in a very nautical, paradise mood lately!

My shelf was missing the hooks, so I bought some new ones real quick.  The nails are so tiny so be careful not to lose them!

Voila!  My shelf is all finished! I like that it isn't perfect.  It looks kind of distressed, just like my room right now.  I'm ashamed of how dirty I have been lately! No judging!

So that's it folks! Easy as can be! I challenge you all to find $1 finds and fix them up! They can have so much character. I'd love to see any pictures if you guys do the same! Glad to be back!
XOXO
Abby :)


*Linking up with Keep Calm & Link Up


Tuesday

Olioboard - Create Your Own Decorating Mood Board


Turquoise Dream Office by Niki on Olioboard

Hi.  I'm Niki, and I'm a Clip-aholic.  My whole life, I have been obsessed with magazine clippings.  Maybe it's because I soon forget things that inspire me, or maybe it's because I am somewhat of a hoarder who just can't stand the thought of getting rid of something I find beautiful, unique or useful.  I find many reasons to clip and many uses for the things I clip.  When I was a little girl, my cousin and I took my grandmother's (Memaw) Sears catalogs and created an entire doll house and dolls out of our clippings.  I outgrew the desire to play with paper dolls, but I haven't outgrown my love for clipping things and creating inspiration boards from them.  The hard part is finding what I clipped once I have taken the time to cut it out.  That's why I love the new website that I just discovered -- Olioboard

Olioboard is similar to pinterest in that you can clip online inspiration and pin it right to the catagory you want and you can browse from others' creations to find more inspiration.  However, it goes a step beyond by allowing you to create an entire room with your clippings. 

Olioboard Outdoor Oasis by Niki

With just a few clicks, you'll feel like a professional designer.  It's a simple process: pick your background, clip, place, rotate, adjust, save and publish.  Then you can see what your space will look like.  While you're there, stop by and follow me at www.olioboard.com/users/NikiKnows.  I'm sure that as time allows, my space will start filling up with my design ideas.


Happy Clipping!!

Niki

**Don't forget to follow HomeMadeville above!!**