Wednesday

Card Making Made Easy

Easy Homemade Card

A couple of weeks ago I received a package in the mail that made my day!  I received a box full of David Tutera Paper Crafts which are Coming Soon to JoAnn's.  The best part is that I got to try it out before it was even available.   

Card Making Made Easy

What I love most about the products is that you can make layered and embellished cards in a fraction of the time, and they are absolutely beautiful.  They are as easy as 1-2-3!

Pick a Card and Envelope Combo
Step 2 - Add Layers to Your Cards. Sand It if Needed.
Embellish the Card and Envelope

Because I was so impressed with the ease and beauty of the line, I made a little video to show you just how quick and easy it truly can be to show your love with a handmade card.


A handmade card using the Sand It feature

Although these supplies were designed for cards, you will find they are a great addition to many projects.  Just to show you the versatility, I created a scrapbooking type page to insert in my school notebook.  As I sit in my journalism classes, my little creation keeps me inspired and motivated.

A plain notebook gets a new look with card making supplies.

I started with a simple notebook and scrapbook paper.  Then, I added one of the pink cards (opened), layered the Step 2 silver cutout layer which I love, and embellished with a "Make a Wish" tag, flowers, a jewel and a few journalism related stickers.  I love how just sliding it all inside the clear cover of my binder added such style to my notebook. 

Paper Craft Layered Details

Here are a few other fabulous projects from some amazingly creative bloggers:


To sweeten the deal on this amazing product line, three lucky winners will receive a $300 grand prize pack of supplies from David Tutera's Celebrate Cardmaking line AND a personally signed book from David!  20 additional winners will receive a $50 Celebrate prize pack.  Sign up here for a chance to win: http://pages.exacttarget.com/tutera-optin-blog/.


Keep up with the David Tutera Celebrates Cardmaking line is easy at these links:

Facebook         Twitter          YouTube


*I received product in exchange for this post. However, the opinions are 100% my own.

Tuesday

Peanut Butter Pie Trifle


Not that long ago, a friend posted a picture on facebook of a trifle she made.  I instantly thought it was a peanut butter pie trifle.  WRONG!  It was a banana pudding trifle.  Although there is certainly nothing wrong with banana pudding, I was suddenly craving peanut butter pie and hoping to find a trifle that would cure my craving and be all the rave at my upcoming family gathering.

So, off to the web I went, hoping for just such a trifle.  When I couldn't find what I was looking for...  a little chocolate, some nutter butter cookies, and definitely peanut butter pie filling...I decided to create my own.


Friday

How to Create Embellished Hair Accessories

Embellished Hair Bands

Today I have the pleasure of being featured by Carolina at Moore Craft Time & Angie at The Country Chic Cottage for their Craft Lightning Challenge.

Sometimes we need to release our creative juices but only have 15 minutes or so of free time, and that is the premise of the challenge...a 15 minute or less craft.

The other day when I was shopping, I saw these "Charm"ing Hair Elastics.  I almost bought them; then I thought of my hair accessory bin filled with plain hair bands.  Suddenly, I was inspired to embellish hair accessories for my Craft Lightning Challenge and save myself some money.

Remington Hair Elastic Inspiration

Easy, DIY Hair Elastic Tutorial:

Embellished Hair Elastic Craft Supplies

Supplies Needed: 
Needle Nose Pliers            Jump Rings
 2 hair elastics               Charms  

Easy, DIY Embellished Hair Elastics
                                   
                                        1.  Open the jump rings slightly so the charms will fit inside.      
                                        2.  Place the rings on the hair elastic and the charm on the ring. 
                                        3.  Use the pliers to pinch the jump ring together.                        

            That's it!!  Now you have a simple, quick, & useful DIY craft project. 


Now head on over to Moore Craft TimeThe Country Chic Cottage to check out all of the other LIGHTNING fast crafts.


Happy Crafting!!

Niki


Saturday

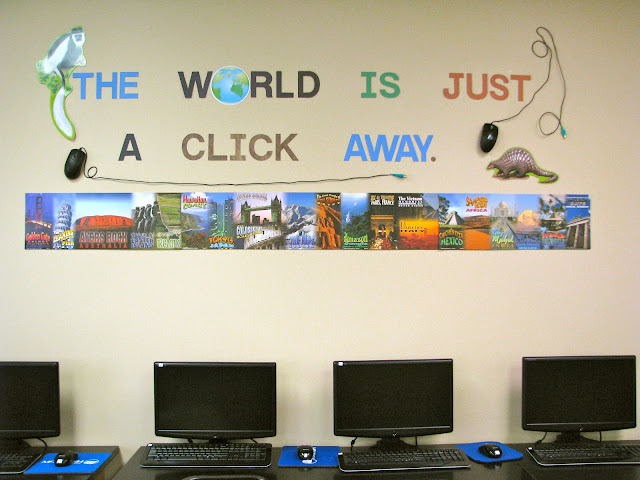
Computer Lab Bulletin Board

 
It's Back to School time all across the country.  Some are just getting prepared, and others have been in session for weeks.  Here at Homemadeville, it means our Summer Break is over and the posts should start rolling in again.  Since school seems to be a common theme all around, and I happen to do volunteer work at a local school, I thought I would kick off our new season of blogging with my computer room bulletin board.

Computer Lab Bulletin Board

At our school, the computer room doesn't actually have bulletin boards, but there is plenty of wall space that needs pizzazz.  I started out by thinking of words that are associated with computers, like network, web, online, click, mouse, etc.  Then I started thinking of ways they could be incorporated into room decor.  Since our computer lab just converted from plug in mice to wireless, I knew I could find a few to use with my "Click" decor.  (Please note: no mice were harmed in the decorating of this room.)  I used painter's tape to safely attach the paper goods to the wall without stripping the paint away.  For the mice, I stapled the cords to the wall (making sure to go around the cords not through them).  Then, I used painter's tape to secure the mice into the position I wanted.  The picture below gives a little closer view of the safari detail on the word "click", as well as the world locations featured below the wording.

Computer Room Bulletin Board Idea
  
Many of the students, teachers and parents have commented on how much they like the new decor, which is all I need to feel like my idea was a success.